WordPress Dashboard and Top Navigation
1. The WordPress Dashboard
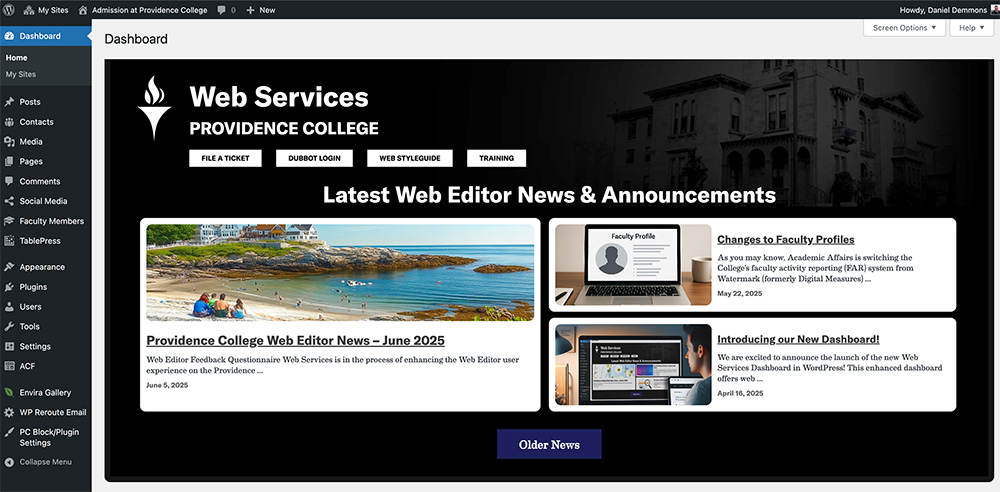
The WordPress dashboard is your jumping off point for all things WordPress- it’s where you can see all the administrative links, icons that link to where all of your web pages, blog posts, media, and other settings live.
Please note- The Latest Web Editor News & Announcements – Please make sure to check it after logging in. The Web Team sporadically posts information important to Web Editors, such as functionality changes, planned service outages, and other updates.
2. Top Navigation Bar

There are six relevant areas/links within the top Navigation Bar in WordPress – The WordPress “W”, My Sites Menu, Site Menu, Comments/Discussions Icon, the New button, and the User Account area.
2a. The WordPress “W”

The WordPress “W” drop-down menu contains various support links and resources for vanilla or generic WordPress. While this is a great resource to learn more about WordPress in general, it’s not a valid resource to learn more about Providence College’s highly-customized version of WordPress.
2b. The My Sites Menu

The My Sites Menu drop-down gives Web Editors who have editing access on multiple sites, a way of easily jumping back and forth to the dashboards of those sites without having to login to each separately. If you are a Web Editor who edits on multiple providence.edu sites, you will see them listed under this menu. Simply roll your mouse over the site that you would like to begin editing on, and you will see the Dashboard option, if you click on it, it will take you to the dashboard for that site. If you have access to only a single site, you will see it listed alone under this menu.
2c. Site Menu

The Site Menu changes to indicate the name of the site you are editing on. In the above screenshot, it indicates that we are within the Web Services site. Clicking on “Visit Site” takes you to the home page of the site you are on in view-mode. Clicking on “Edit Site” takes you to the home page of your site in editing-mode. You won’t see the Clone site option.
2d. Comments/Discussions Icon

The comments icon is a shortcut to the comments/discussion control area where you can review and approve/disapprove comments before they are posted to your site. If there is a comment posted to your site, the number 0 would be replaced with a number indicating the number of comments that have been posted and need review/approval. By default, we have commenting/discussions shut off across the providence.edu websites. You can however, activate them on a page-by-page or post-by-post basis. If you would like more information regarding Comments/Discussions, please reach out to the Web Team and we can chat further.
2e. The New Menu
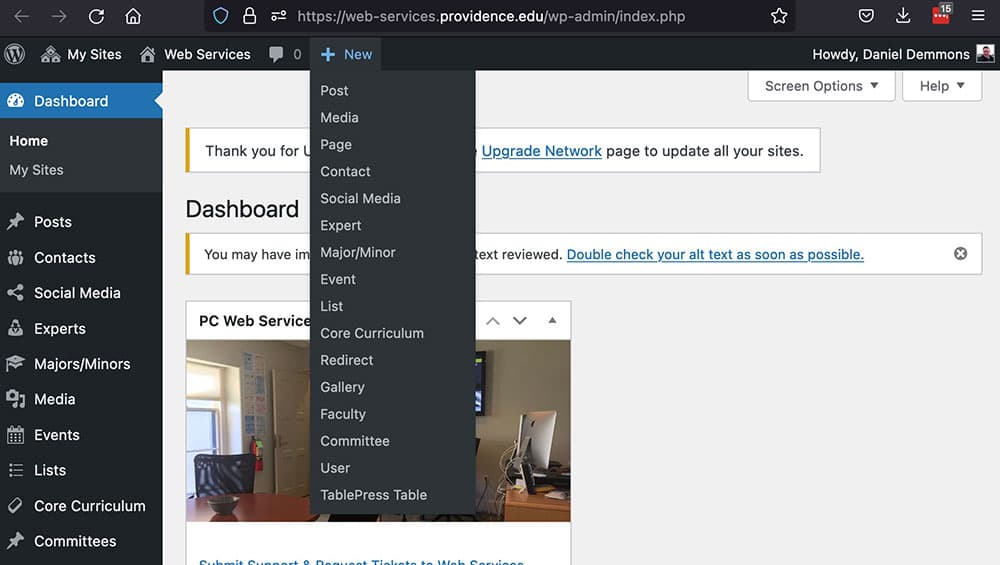
The New Menu is your quickest and easiest way to start creating or adding new content to your site. Depending upon how your site is configured, you may see more or less options than what is pictured in the screenshot above. Click on one of the options under this menu to create a new post, upload new media, create a new web page, etc. You will find that in the side navigation within each subsection, there is also a “new” button relevant to that particular section. It functions exactly the same way as the options under the new menu function.
Department of Web Design, Architecture, & Services
Martin Hall Room 302
401.865.1755
web@providence.edu

